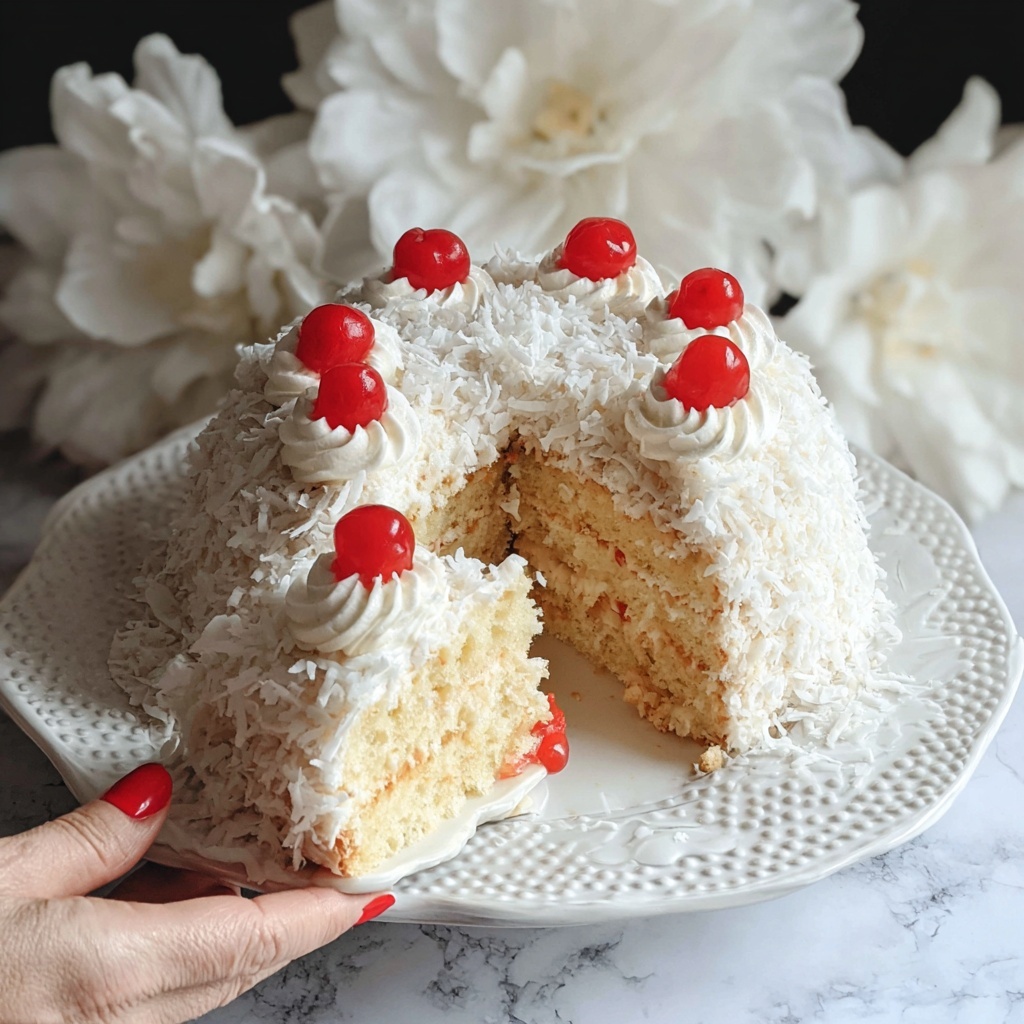
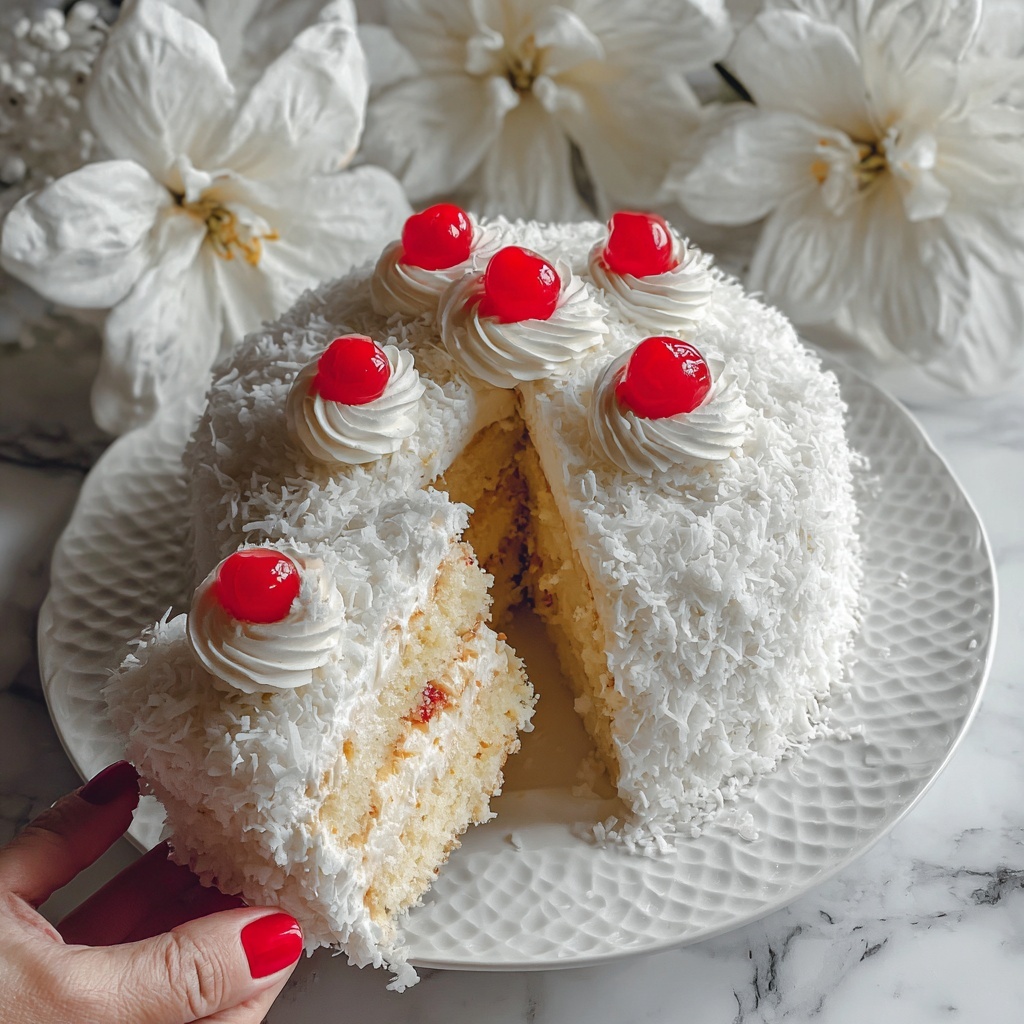
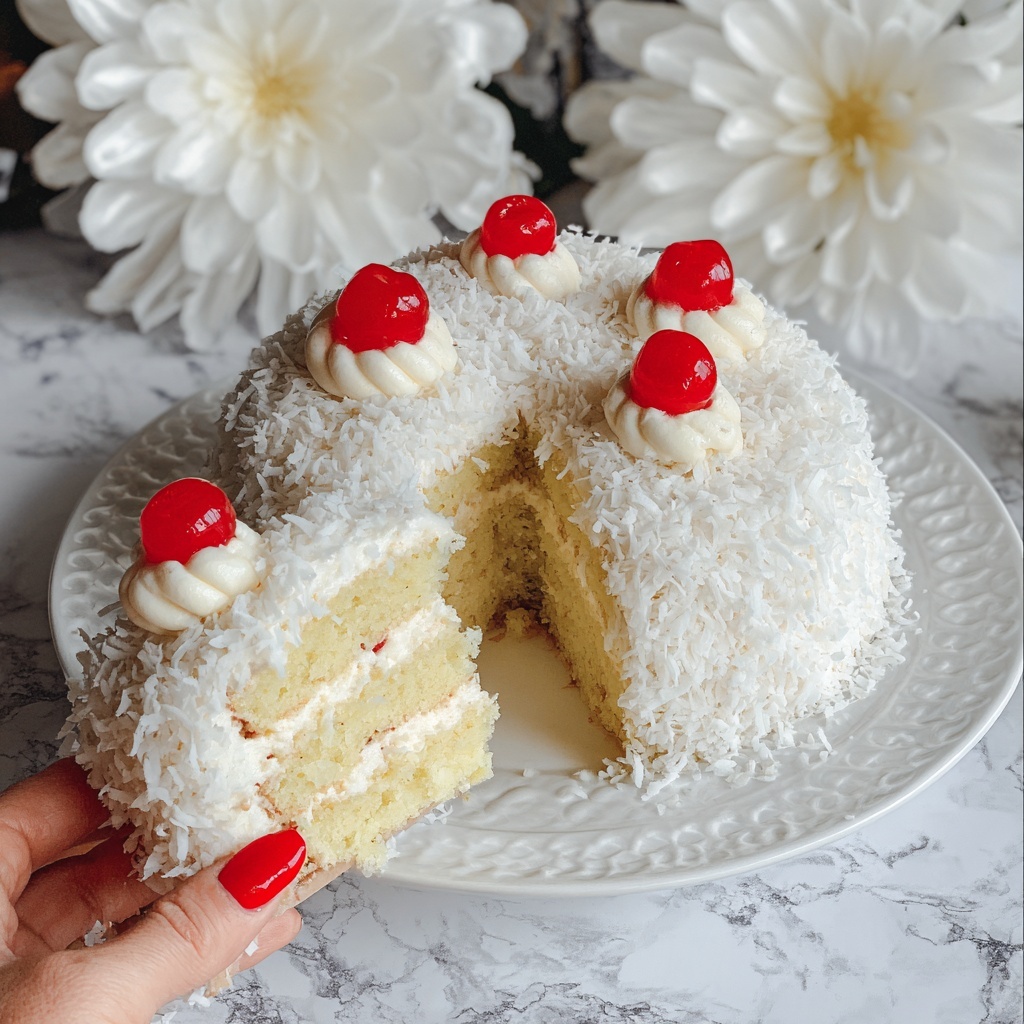
There is something truly magical about the fluffy, creamy, and coconut-covered Old-Fashioned Snowball Cake Recipe that instantly takes you back to cozy family gatherings and joyful celebrations. This cake is a stunning combination of tender vanilla layers wrapped in luscious whipped cream frosting and blanketed with sweet shredded coconut, creating a snowy, cloud-like appearance. It’s a timeless dessert that is both delightful to the palate and charming to behold, making it a must-try for anyone who loves classic cakes with a nostalgic twist.
Ingredients You’ll Need
Gathering these simple yet essential ingredients is the first step toward creating a cake that bursts with flavor, smooth texture, and that signature snowy look. Each element plays a pivotal role — from the buttery richness in the layers to the creamy lightness of the frosting, culminating in the coconut that gives this cake its unforgettable charm.
- All-purpose flour (2 ½ cups): The sturdy base that creates tender cake layers.
- Baking powder (2 ½ teaspoons): Helps the cake rise to fluffy perfection.
- Salt (½ teaspoon): Balances sweetness and enhances flavor depth.
- Unsalted butter, softened (1 cup): Adds rich moisture and indulgence.
- Granulated sugar (2 cups): Sweetens the batter evenly without overpowering.
- Eggs, room temperature (4 large): Provide structure and contribute to a fine crumb.
- Vanilla extract (2 teaspoons total): Infuses classic warmth and aromatic notes.
- Almond extract (1 teaspoon): Offers a subtle nutty accent that elevates the profile.
- Whole milk (1 cup): Keeps the batter moist and tender.
- Heavy whipping cream (3 cups): Whipped into decadent frosting for lightness and creaminess.
- Powdered sugar (⅓ cup): Sweetens the whipped cream and makes it silky smooth.
- Sweetened shredded coconut (2 ½ cups): Coats the cake and lends the iconic snowy texture and flavor.
How to Make Old-Fashioned Snowball Cake Recipe
Step 1: Prepare Your Pans and Oven
Preheat your oven to a warm 350°F (175°C). Grease two 9-inch round cake pans and dust them lightly with flour so your cake layers release easily. Don’t forget to line the bottoms with parchment paper — it’s a small step that makes removing those beautiful cakes a breeze.
Step 2: Combine Dry Ingredients
In a medium bowl, whisk together the flour, baking powder, and salt. This ensures your leavening agent is evenly distributed, which helps the cake rise perfectly and taste balanced.
Step 3: Cream Butter and Sugar
In a large bowl, beat the softened butter and granulated sugar on medium speed until the mixture turns light and fluffy—about three to four minutes. This step is crucial because incorporating air here sets the stage for a tender crumb and a moist cake.
Step 4: Add Eggs and Extracts
One by one, add the eggs, beating well after each addition to keep that fluffy texture. Stir in vanilla and almond extracts next—this duo adds a marvelous fragrant warmth and an irresistible hint of nutty sweetness that transforms the cake’s character.
Step 5: Mix Dry Ingredients and Milk Alternately
Add your flour mixture and milk in alternating batches, starting and finishing with the dry ingredients. Be careful not to overmix; just stir until everything is combined to keep your cake light and soft.
Step 6: Bake the Cake Layers
Divide the batter evenly between your prepared pans, smoothing the tops gently. Bake for 25 to 30 minutes, or until a toothpick inserted in the center emerges clean. This step locks in moisture while creating those tender, golden layers essential for the cake’s perfect texture.
Step 7: Cool the Cakes
Once out of the oven, let the cakes cool in their pans for 10 minutes to firm up. Then transfer them to a wire rack to cool completely. Cooling fully is key before frosting, so your whipped cream won’t melt or slide off.
Step 8: Whip the Cream Frosting
Using a chilled bowl and beaters, whip the heavy cream with powdered sugar and vanilla extract until stiff peaks form. This luscious whipped cream creates that smooth and light frosting that contrasts beautifully with the cake’s tender crumb.
Step 9: Assemble Your Snowball Cake
Place one cake layer on your serving plate and spread a generous layer of whipped cream over it. Carefully add the second layer, then frost the entire top and sides with the remaining whipped cream. This frosting stage is your canvas for the final snowy effect.
Step 10: Add the Signature Coconut Coating
Press sweetened shredded coconut all over the whipped cream-coated cake until it’s completely covered. This step brings the iconic look and sweet texture that give this dessert its “snowball” name. Chill the cake for at least one hour to let everything set nicely before slicing and serving.
How to Serve Old-Fashioned Snowball Cake Recipe
Garnishes
A sprinkle of toasted coconut flakes or a few fresh berries can add a pop of color and texture to your cake without overpowering its classic flavor. You might also consider tiny edible silver balls for a festive touch that echoes the snowy theme.
Side Dishes
Serve slices alongside a cup of rich coffee or a glass of cold milk for a nostalgic pairing that makes every bite even more comforting. Fresh fruit salads or lightly tart berry compotes also complement the sweetness and creaminess perfectly.
Creative Ways to Present
For gatherings, try individual mini versions of the Old-Fashioned Snowball Cake Recipe in cupcake liners, topped with whipped cream and coconut. Alternatively, layer the cake pieces in clear glass trifle bowls with coconut flakes for a stunning visual that showcases every delicious element.
Make Ahead and Storage
Storing Leftovers
Wrap leftover cake tightly with plastic wrap or store in an airtight container to keep moisture locked in. Refrigerate leftovers to maintain the freshness of the whipped cream frosting and enjoy within three days for the best taste.
Freezing
You can freeze the cake after it is fully assembled and frosted. Wrap it securely in plastic wrap and then aluminum foil to protect it from freezer burn. Thaw overnight in the refrigerator before serving to preserve that creamy texture and delicate coconut coating.
Reheating
This cake is best enjoyed chilled and does not require reheating. However, if you prefer to soften it slightly, let the slices sit at room temperature for 15-20 minutes before serving, which enhances the flavor without compromising texture.
FAQs
Can I substitute whipping cream with another type of cream?
For the fluffiest whipped cream frosting, heavy whipping cream is best because of its high fat content. Substitutes like half-and-half or light cream won’t whip properly and can result in a runny frosting.
What is the role of almond extract in this recipe?
Almond extract adds a subtle nutty note that complements the vanilla and coconut, giving the cake an extra depth of flavor that feels nostalgic and special.
How do I ensure the cake layers come out moist?
Be careful not to overmix your batter, and make sure not to overbake the layers. The toothpick test should be your go-to for doneness, and removing the cakes promptly from the oven helps keep them soft.
Is it necessary to chill the cake before serving?
Yes, chilling helps the whipped cream frosting to firm up and the coconut coating to set, which prevents the frosting from sliding off when slicing and serving.
Can I make this cake gluten-free?
You can try substituting the all-purpose flour with a gluten-free flour blend, but be aware that the texture may vary and you might need to adjust the baking time or additional ingredients for optimal results.
Final Thoughts
If you’re craving a nostalgic, tender, and fluffy treat that’s both visually stunning and incredibly delicious, the Old-Fashioned Snowball Cake Recipe is your perfect match. Sharing this cake with family and friends always brings smiles and sweet memories, so don’t hesitate to roll up your sleeves, bake a batch, and enjoy a slice of that classic homemade goodness.
Print
Old-Fashioned Snowball Cake Recipe
- Prep Time: 20 minutes
- Cook Time: 30 minutes
- Total Time: 1 hour 20 minutes
- Yield: 12 servings
- Category: Dessert
- Method: Baking
- Cuisine: American
Description
This classic Old-Fashioned Snowball Cake features light and fluffy vanilla-almond sponge layers layered with rich whipped cream frosting, all enveloped in a blanket of sweet shredded coconut. Perfect as a nostalgic dessert for gatherings, this cake combines traditional baking with a delicate, creamy finish that is sure to be a crowd-pleaser.
Ingredients
Cake
- 2 ½ cups all-purpose flour
- 2 ½ teaspoons baking powder
- ½ teaspoon salt
- 1 cup unsalted butter, softened
- 2 cups granulated sugar
- 4 large eggs, room temperature
- 1 teaspoon vanilla extract
- 1 teaspoon almond extract
- 1 cup whole milk
Whipped Cream Frosting
- 3 cups heavy whipping cream
- ⅓ cup powdered sugar
- 1 teaspoon vanilla extract
Topping
- 2 ½ cups sweetened shredded coconut
Instructions
- Preheat and Prepare Pans: Preheat your oven to 350°F (175°C). Grease and flour two 9-inch round cake pans, then line the bottoms with parchment paper to prevent sticking.
- Mix Dry Ingredients: In a medium bowl, whisk together the all-purpose flour, baking powder, and salt to evenly combine and ensure proper leavening.
- Cream Butter and Sugar: In a large bowl, beat the softened unsalted butter together with granulated sugar until the mixture is light and fluffy, which should take about 3 to 4 minutes using a mixer.
- Add Eggs and Flavorings: Incorporate eggs one at a time into the butter-sugar mixture, beating well after each addition. Then mix in vanilla and almond extracts for flavor depth.
- Combine Wet and Dry Ingredients: Alternately add the dry ingredient mixture and whole milk to the batter, beginning and ending with the dry mix. Stir gently until just combined to avoid overmixing.
- Divide and Bake: Evenly divide the batter between the prepared pans, smoothing the tops with a spatula. Bake in the preheated oven for 25 to 30 minutes or until a toothpick inserted into the center comes out clean.
- Cool the Cakes: Let the cakes cool in their pans for 10 minutes, then transfer them onto a wire rack to cool completely before frosting.
- Whip the Cream: Whip the heavy cream, powdered sugar, and vanilla extract in a chilled bowl until stiff peaks form, creating a light and stable whipped cream frosting.
- Assemble the Cake: Place one cake layer on your serving plate and spread a generous amount of whipped cream over it. Top with the second cake layer and frost the top and sides with the remaining whipped cream.
- Decorate and Chill: Press the sweetened shredded coconut onto the frosted cake to cover all surfaces. Chill the cake in the refrigerator for at least one hour to allow the flavors to meld and the frosting to set before serving.
Notes
- Ensure eggs are at room temperature for better batter incorporation and cake texture.
- Use chilled bowls and beaters when whipping cream for optimal volume.
- The shredded coconut is sweetened, but toasting it lightly before applying can add a nice depth of flavor if desired.
- For a dairy-free version, substitute milk and cream with suitable alternatives, though texture and flavor may vary.
- Leftover cake can be stored covered in the refrigerator for up to 3 days to maintain freshness.


