
There’s something truly magical about a warm slice of homemade pie fresh from the oven, and this Classic Apple Pie Recipe is exactly that kind of magic. Bursting with tender, cinnamon-kissed apples wrapped in a perfectly flaky, buttery crust, this recipe brings all the comforts of home right to your table. Whether you’re baking for a family gathering or simply craving a nostalgic treat, this Classic Apple Pie Recipe is a timeless favorite that will make your kitchen smell like fall all year round.
Ingredients You’ll Need
The beauty of this Classic Apple Pie Recipe lies in its simple yet essential ingredients, each playing a crucial role in building layers of flavor, texture, and that irresistible golden color. These pantry staples come together to create a dessert that’s both familiar and extraordinary.
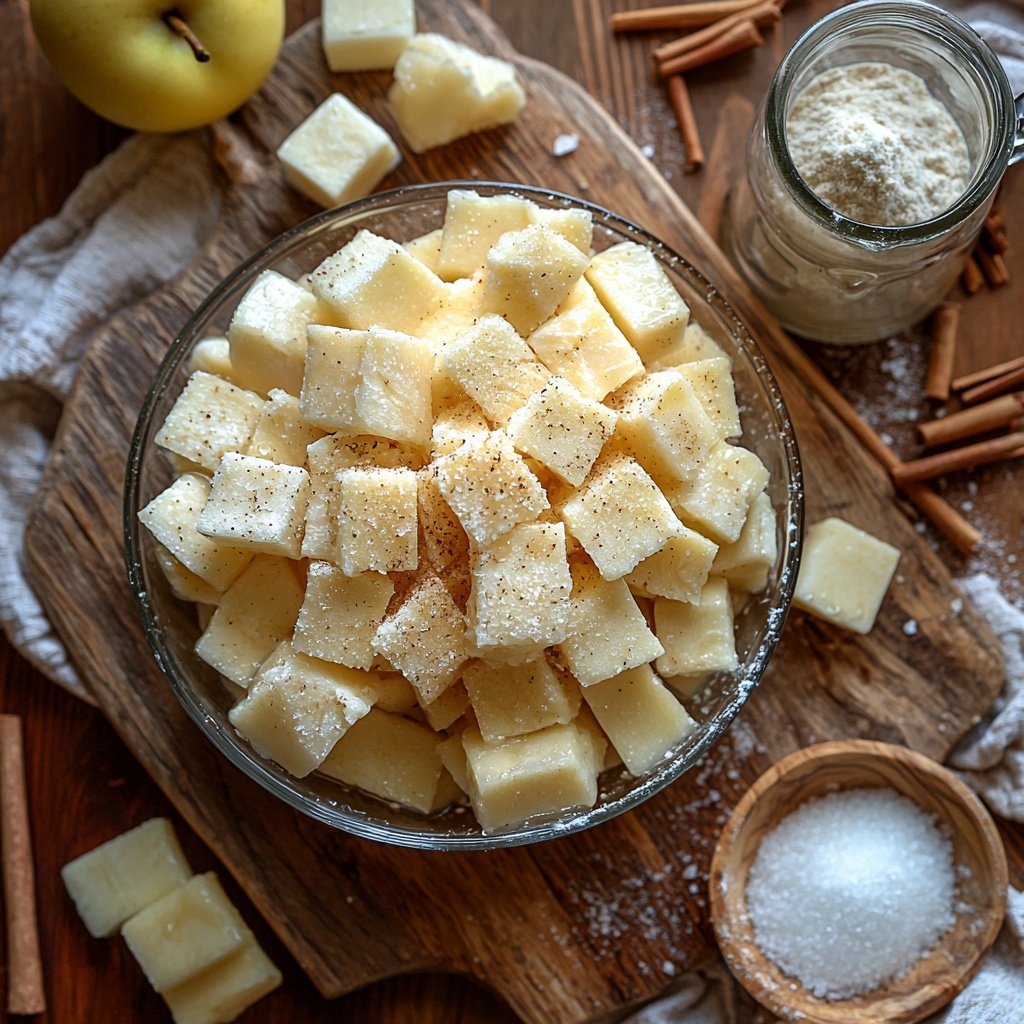
- 2 ½ cups all-purpose flour: This forms the base of your crust; the right amount ensures flakiness without toughness.
- 1 teaspoon salt: Enhances all the flavors and balances the sweetness perfectly.
- 1 tablespoon sugar: Adds a subtle sweetness to the pastry dough, helping it brown beautifully.
- 1 cup unsalted butter, chilled: Essential for that tender, flaky crust packed with rich buttery goodness.
- 6–8 tablespoons cold water: Helps bring the dough together without melting the butter.
- 6 cups apples, peeled and sliced: The star of the show; tart yet sweet apples create the ideal filling.
- ¾ cup sugar: Sweetens the apples while balancing their natural tartness.
- 2 tablespoons lemon juice: Brightens the filling and prevents the apples from browning.
- 1 teaspoon cinnamon: Adds warm spice that perfectly complements the fruit.
- ¼ teaspoon nutmeg: A subtle hint of nutmeg rounds out the spice blend beautifully.
- 2 tablespoons all-purpose flour: Thickens the filling so it’s perfectly set when you slice into your pie.
How to Make Classic Apple Pie Recipe
Step 1: Prepare the Pie Crust
Begin by mixing the flour, salt, and sugar in a large bowl. Cut in the chilled butter with a pastry blender or your fingertips until the mixture resembles coarse crumbs. Gradually add the cold water, just enough for the dough to come together without becoming sticky. Divide the dough into two portions, wrap each in plastic wrap, and refrigerate for at least 30 minutes. This rest period firms the butter and relaxes the gluten, setting you up for a perfect crust.
Step 2: Preheat the Oven
Preheat your oven to 425°F (220°C). Starting with a hot oven helps set the crust’s shape quickly and creates that coveted golden hue.
Step 3: Roll Out and Fit the Bottom Crust
On a lightly floured surface, roll out one half of your dough into a circle large enough to fit your pie dish. Transfer it carefully into the dish, letting a little overhang hang over the edges. Trim away any excess dough for a clean finish.
Step 4: Make the Apple Filling
In a large bowl, toss the peeled and sliced apples with sugar, lemon juice, cinnamon, nutmeg, and flour. This mix of spices and lemon juice ensures every bite bursts with spiced, tart-sweet flavor while the flour keeps the filling from getting runny.
Step 5: Assemble the Pie
Pour the apple filling evenly into the bottom crust. Roll out the second half of the dough and gently lay it over the filling. Seal the edges by pinching the top and bottom crusts together and trim any excess dough. For extra charm, crimp the edges or use fork tines to press the edges decoratively, and don’t forget to cut a few small slits on top to let steam escape.
Step 6: Bake the Pie
Bake at 425°F (220°C) for 15 minutes to set the crust, then reduce the temperature to 350°F (175°C) and continue baking for an additional 35 to 45 minutes until the pie is beautifully golden brown and the filling is bubbling.
Step 7: Cool Before Serving
Once out of the oven, let your Classic Apple Pie Recipe cool on a wire rack for at least two hours. This resting time allows the filling to thicken and set, making each slice clean and scrumptious.
How to Serve Classic Apple Pie Recipe
Garnishes
A dollop of freshly whipped cream or a scoop of vanilla ice cream takes this Classic Apple Pie Recipe to another level of comfort. Sprinkle a light dusting of cinnamon or powdered sugar on top for a delicate finish that looks as good as it tastes.
Side Dishes
Serving the pie with a warm caramel sauce or a drizzle of maple syrup adds a decadent touch, while a cup of hot coffee or spiced chai perfectly balances the sweetness and spices in the pie.
Creative Ways to Present
Want to wow your guests? Serve individual mini apple pies baked in ramekins or turn the leftovers into apple pie milkshakes or parfaits layered with granola and yogurt. This Classic Apple Pie Recipe is surprisingly versatile and sure to inspire new favorites.
Make Ahead and Storage
Storing Leftovers
Wrap the pie tightly with plastic wrap or store it in an airtight container at room temperature for up to two days. If you prefer, keep it refrigerated for up to four days to maintain freshness.
Freezing
You can freeze the pie either unbaked or fully baked. For the best texture, freeze the assembled, unbaked pie and bake it straight from frozen with an extra 15 minutes of baking time. Wrap it securely in plastic and then foil to prevent freezer burn.
Reheating
To enjoy leftovers warm, reheat slices in the oven at 350°F (175°C) for about 15 minutes. Avoid microwaving if possible as it can make the crust soggy; a warm oven crisps it right back up beautifully.
FAQs
Can I use any type of apples for this Classic Apple Pie Recipe?
While you can experiment, using tart apples like Granny Smith or a mix of sweet and tart apples will give you the best texture and flavor balance for your pie.
How do I prevent the crust from getting soggy?
Blind baking the bottom crust slightly before adding the filling or sprinkling a thin layer of flour or ground nuts on the crust can help absorb excess moisture and keep the crust crisp.
Can I make this pie vegan or gluten-free?
Yes! Substitute butter with coconut oil or vegan margarine and use a gluten-free flour blend in place of all-purpose flour to enjoy a vegan or gluten-free version of this Classic Apple Pie Recipe.
Why should I chill the dough before rolling it out?
Chilling the dough firms up the butter, which prevents the crust from becoming greasy and ensures a flaky texture when baked.
How long can I keep the pie in the freezer?
For best quality, consume your frozen pie within two months. Beyond that, it’s still safe to eat but may lose some flavor and texture integrity.
Final Thoughts
There’s truly nothing like the joy of biting into a slice of this Classic Apple Pie Recipe, with its perfect harmony of buttery crust and spiced apple filling. Whether you’re baking for a special occasion or simply to treat yourself, I hope this recipe becomes a cherished staple in your kitchen. Give it a try and enjoy every warm, comforting bite!
Print
Classic Apple Pie Recipe
- Prep Time: 30 minutes
- Cook Time: 50 minutes
- Total Time: 1 hour 20 minutes
- Yield: 8 servings
- Category: Dessert
- Method: Baking
- Cuisine: American
Description
This Classic Apple Pie recipe combines a flaky, buttery crust with a spiced apple filling, creating a timeless dessert perfect for any occasion. The pie is baked to golden perfection, balancing tart and sweet flavors with warm cinnamon and nutmeg notes.
Ingredients
For the Crust
- 2 ½ cups all-purpose flour
- 1 teaspoon salt
- 1 tablespoon sugar
- 1 cup unsalted butter, chilled
- 6–8 tablespoons cold water
For the Filling
- 6 cups apples, peeled and sliced
- ¾ cup sugar
- 2 tablespoons lemon juice
- 1 teaspoon cinnamon
- ¼ teaspoon nutmeg
- 2 tablespoons all-purpose flour
Instructions
- Prepare the crust: In a large bowl, mix the flour, salt, and sugar. Cut in the chilled unsalted butter using a pastry blender or fingers until the mixture is crumbly. Gradually add cold water, one tablespoon at a time, stirring until a dough forms. Divide the dough into two equal portions, shape into disks, wrap in plastic, and refrigerate for at least 30 minutes.
- Preheat the oven: Set your oven to 425°F (220°C) to prepare for baking the pie.
- Roll out the bottom crust: On a lightly floured surface, roll out one disk of dough into a circle about 12 inches in diameter. Place it into a 9-inch pie dish and trim the edges with a knife.
- Prepare the filling: In a large bowl, combine the peeled and sliced apples with sugar, lemon juice, cinnamon, nutmeg, and flour. Toss gently to coat the apples evenly.
- Assemble the pie: Pour the apple filling evenly into the prepared crust. Roll out the second dough disk into a circle and place it over the filling. Seal and crimp the edges by pinching the bottom and top crusts together.
- Bake the pie: Place the pie on the middle rack and bake at 425°F (220°C) for 15 minutes. Then reduce the temperature to 350°F (175°C) and continue baking for 35 to 45 minutes more until the crust is golden brown and the filling is bubbling.
- Cool before serving: Remove the pie from the oven and let it cool on a wire rack for at least two hours to allow the filling to set properly. Serve warm or at room temperature.
Notes
- Use tart apple varieties like Granny Smith or Honeycrisp for the best flavor and texture.
- Chilling the dough disks before rolling helps achieve a flakier crust.
- If the crust edges brown too quickly during baking, cover them with foil to prevent burning.
- Allowing the pie to cool completely before slicing ensures cleaner cuts and better flavor development.

