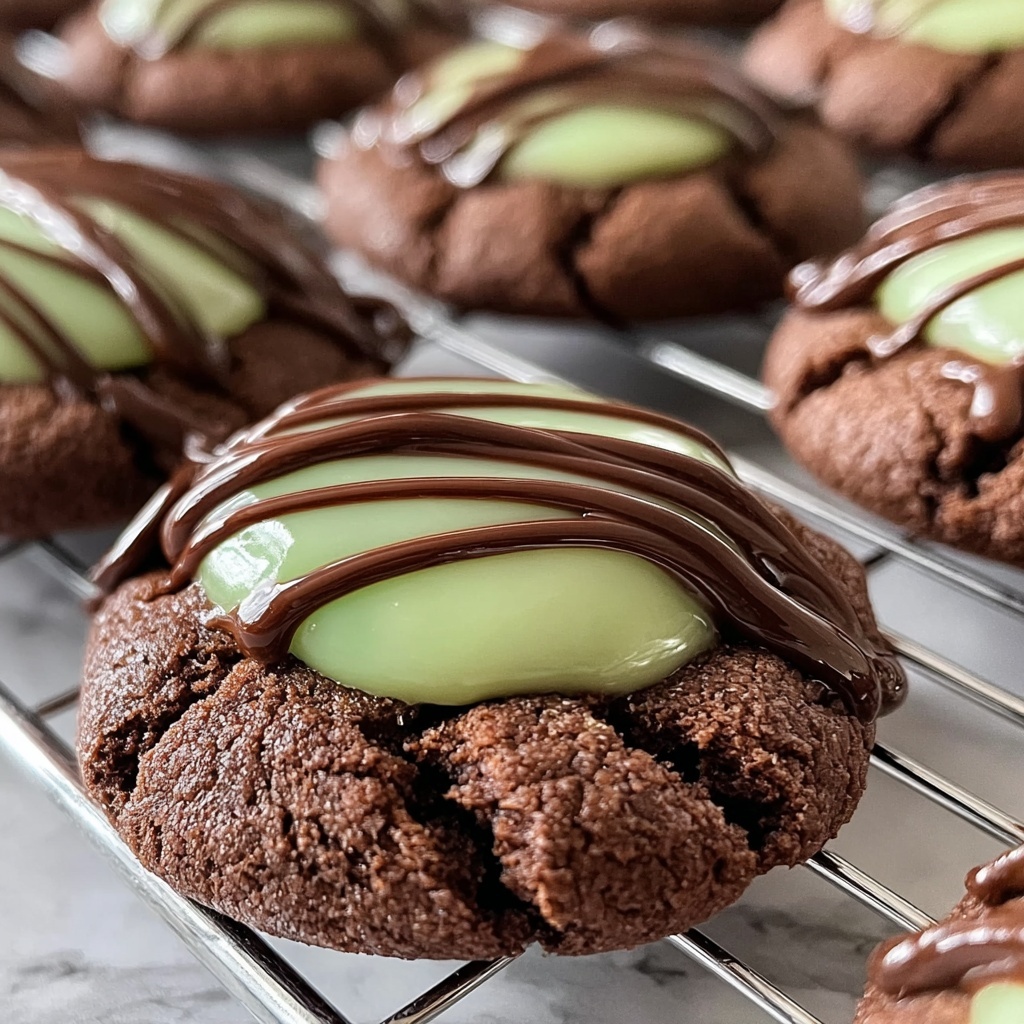
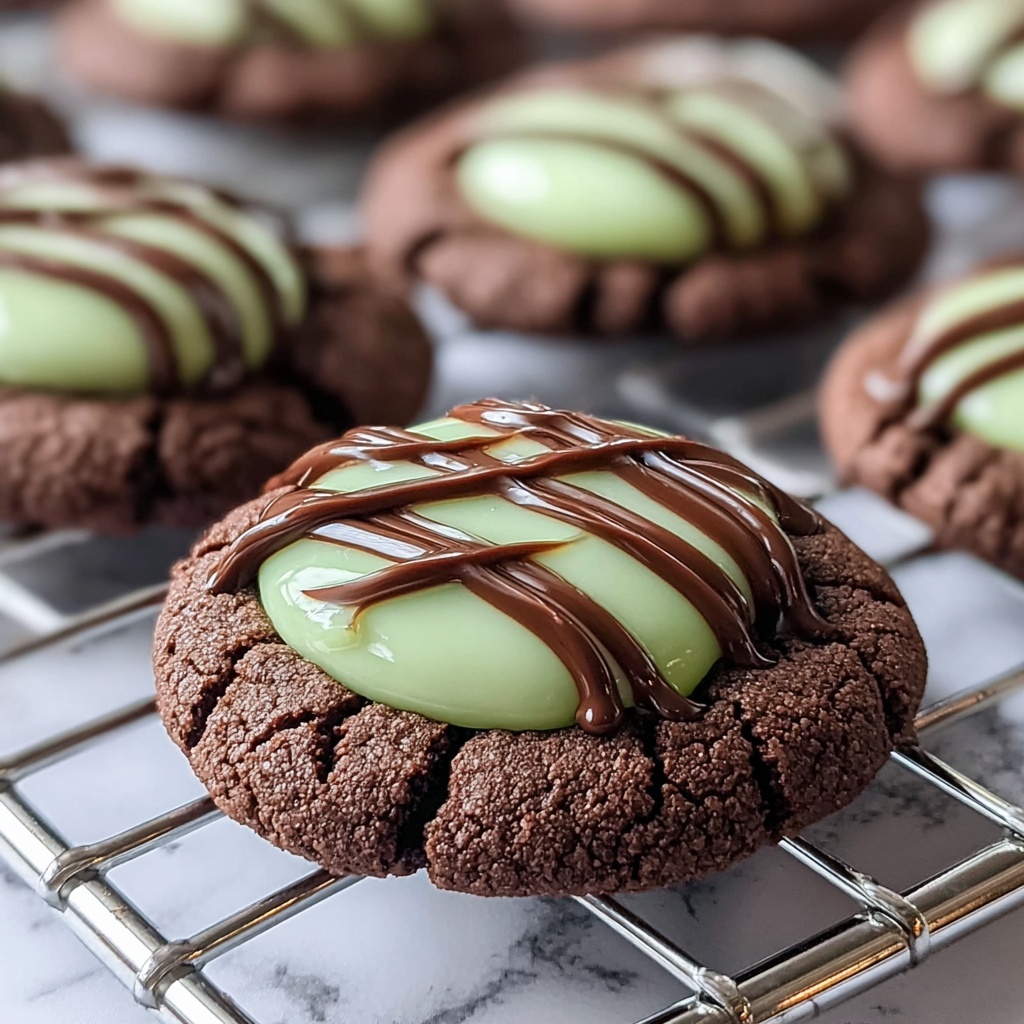
If you have a soft spot for the magical combo of chocolate and mint, I’m so excited to share this Chocolate Mint Thumbprint Cookies Recipe with you! These cookies have a rich, cocoa-kissed base with a gooey, minty white chocolate fudge center that’s not too sweet but absolutely indulgent. The thumbprint shape is charming and perfect for filling with that luscious mint fudge, while the drizzle of chocolate almond bark adds that final touch of elegance and extra chocolate bliss. You’ll find that these cookies satisfy every craving for something both classic and a little bit daring, making them a fantastic treat to bake for cozy evenings or festive occasions.

Ingredients You’ll Need
Getting the ingredients together for this recipe is a breeze, but every single one plays a vital role in the delightful outcome. From the buttery richness that gives structure to the cookie, to the cocoa powder and mint extract that deliver the unmistakable flavor profile, these ingredients effortlessly come together to create magic in your kitchen.
- 1 cup butter (room temperature): Provides a tender, melt-in-your-mouth texture and balanced richness.
- 2 cups white sugar: Sweetens the dough perfectly without overpowering the chocolate or mint flavors.
- 2 eggs: Adds moisture and helps bind everything together for a soft cookie.
- 2 teaspoons vanilla extract: Enhances the depth of flavor with warm, aromatic notes.
- 3 cups all-purpose flour: The foundation for the dough’s structure and chewiness.
- 1 cup unsweetened cocoa powder: Delivers that deep, rich chocolate flavor and beautiful dark color.
- ½ teaspoon salt: Balances sweetness and intensifies the chocolate taste.
- ½ teaspoon baking soda: Helps the cookies rise just enough for a light texture.
- ½ teaspoon baking powder: Supports additional leavening to perfect the crumb.
- 2 ounces chocolate almond bark: Melts smoothly to create a rich chocolate drizzle topping.
- 1 ½ cups white chocolate chips: The essential sweetness and creaminess in the mint fudge filling.
- ½ can sweetened condensed milk: Adds lusciousness and creaminess, making the fudge irresistibly smooth.
- ½ teaspoon mint extract: Gives that refreshing mint essence that pairs beautifully with chocolate.
- Green food coloring: Just a few drops transform the mint fudge into a festive, eye-catching treat.
How to Make Chocolate Mint Thumbprint Cookies Recipe
Step 1: Cream Butter and Sugar, Add Eggs and Vanilla
Begin by beating the butter and sugar together in a large mixing bowl until the mixture is fluffy and light. This is the secret to a tender cookie crumb. Next, add the eggs one at a time, ensuring each egg is fully incorporated before adding the next. Stir in the vanilla extract last to infuse the dough with its warm, fragrant undertones.
Step 2: Combine Cocoa, Flour, and Leavening Agents
Slowly mix in the cocoa powder, salt, baking soda, baking powder, and flour. Adding them gradually helps avoid overmixing and ensures the dough comes together in a soft, pliable consistency without toughness. The rich cocoa powder will give your cookies that unmistakably decadent flavor.
Step 3: Shape the Cookies with Thumbprints
Roll your dough into 1-inch balls and neatly place them on a lined baking sheet. Press your thumb gently into the center of each ball to create a little well—this is where the magic of the mint fudge filling will go. Don’t worry if the indentation shrinks a bit during baking; you can always press it again while the cookies are still warm.
Step 4: Bake to Perfection
Pop your tray into a preheated oven set to 350°F (175°C) and bake the cookies for about 12 minutes. As soon as you take them out, check those thumbprints and press down again if needed to maintain the perfect spot for your filling. Allow the cookies to cool completely so the fudge will set beautifully.
Step 5: Prepare the Mint Fudge Filling
In a saucepan over medium heat, melt the white chocolate chips alongside the sweetened condensed milk. Stir constantly until smooth and glossy, then add the mint extract and a few drops of green food coloring for that classic mint hue. This mixture is the creamy, dreamy heart of the cookies.
Step 6: Fill and Decorate the Cookies
Spoon the luscious mint fudge into each cookie’s thumbprint well. To finish, melt the chocolate almond bark and drizzle it generously over the top, adding a lovely contrast and extra chocolate richness. Let the cookies set until firm, and then get ready to enjoy!
How to Serve Chocolate Mint Thumbprint Cookies Recipe
Garnishes
A sprinkle of crushed peppermint candies or finely chopped fresh mint leaves on top of the fudge adds delightful texture and a burst of refreshing aroma. You can also dust a bit of cocoa powder or powdered sugar for an elegant touch that makes the cookies even more gift-worthy.
Side Dishes
Chocolate Mint Thumbprint Cookies pair wonderfully with a steaming cup of hot cocoa or a robust cup of coffee. For a more indulgent treat, serve alongside a scoop of vanilla bean ice cream or creamy whipped cream to balance the minty chocolate richness with a cool, creamy contrast.
Creative Ways to Present
Arrange these cookies on a rustic wooden board surrounded by fresh mint sprigs and small bowls of extra fudge for dipping. For holiday celebrations, stack them in a glass jar tied with a festive ribbon—this turns your delightful cookie into a charming gift that everyone will appreciate.
Make Ahead and Storage
Storing Leftovers
You can store your leftover Chocolate Mint Thumbprint Cookies in an airtight container at room temperature for up to a week. Just be sure they are completely cooled before sealing to prevent the fudge from becoming overly sticky or melting into the cookies.
Freezing
If you want to keep them longer, freeze the cookies after baking but before filling with the fudge. Freeze them flat on a baking sheet and then transfer to an airtight container or freezer bag. When ready to enjoy, thaw, add the mint filling, and drizzle with chocolate almond bark for freshest flavor and texture.
Reheating
To warm them slightly, place the cookies in a low oven (around 300°F) for 5 minutes or microwave briefly for about 10 seconds. This softens the cookie and melts the fudge just enough for a deliciously gooey bite, but be careful not to overheat and lose their firm structure.
FAQs
Can I substitute the butter with margarine or oil?
Butter is crucial for the rich flavor and texture of these cookies. Margarine can be used in a pinch but may alter the taste and texture slightly. Oil is not recommended as it will change the consistency and make the cookies less firm.
Is there a way to make these cookies dairy-free?
Yes! Use dairy-free butter and substitute the white chocolate chips and condensed milk with coconut milk-based alternatives and vegan white chocolate chips. Keep in mind the flavor may shift slightly but will still be delicious.
Can I swap mint extract for peppermint extract?
Absolutely! Peppermint extract offers a sharper, more intense mint flavor, so start with half the amount and adjust to taste so it doesn’t overpower the chocolate.
What type of cocoa powder works best? Natural or Dutch-processed?
For this recipe, natural cocoa powder is preferred because it reacts better with the baking soda and powder, giving you that lovely rise and deep chocolate flavor. Dutch-processed can be used but might yield a slightly different texture and color.
How do I prevent the thumbprint hole from shrinking during baking?
Press the indent gently but firmly before baking, then check on the cookies as soon as you take them from the oven. If they have puffed up, press them down once more while still warm to maintain that perfect little well for filling.
Final Thoughts
There’s something so wonderfully nostalgic and yet fresh about this Chocolate Mint Thumbprint Cookies Recipe that makes it an absolute must-try. Whether you’re baking for a special occasion, gifting friends and family, or simply indulging yourself, these cookies bring together comforting textures and flavors with a lovely minty twist. I can’t wait for you to try them and make them a new favorite in your cookie repertoire!
Print
Chocolate Mint Thumbprint Cookies Recipe
- Prep Time: 30 minutes
- Cook Time: 12 minutes
- Total Time: 42 minutes
- Yield: 24 cookies
- Category: Dessert
- Method: Baking
- Cuisine: American
Description
Delight in these rich and fudgy Chocolate Mint Thumbprint Cookies, featuring a soft cocoa cookie base filled with a creamy mint-infused white chocolate fudge center, topped with a drizzle of melted chocolate almond bark for an extra touch of indulgence.
Ingredients
Cookie Dough
- 1 cup butter (room temperature)
- 2 cups white sugar
- 2 eggs
- 2 teaspoons vanilla extract
- 3 cups all-purpose flour
- 1 cup unsweetened cocoa powder
- ½ teaspoon salt
- ½ teaspoon baking soda
- ½ teaspoon baking powder
Filling & Topping
- 2 ounces chocolate almond bark
- 1 ½ cups white chocolate chips
- ½ can sweetened condensed milk (about 7 ounces)
- ½ teaspoon mint extract
- Green food coloring (optional, for the mint fudge)
Instructions
- Cream Butter and Sugar: In a large mixing bowl, cream together the room temperature butter and white sugar until the mixture is fluffy and light. Then, add the eggs one at a time, mixing thoroughly after each addition. Stir in the vanilla extract to enhance the flavor.
- Combine Dry Ingredients: Gradually sift in the cocoa powder, salt, baking soda, baking powder, and all-purpose flour. Mix until just combined to form a smooth dough without overworking it.
- Shape Cookies: Roll the dough into 1-inch balls and place them evenly spaced on a baking sheet lined with parchment paper. Use your thumb to press a well into the center of each ball, creating space for the filling.
- Bake Cookies: Bake the cookies in a preheated oven at 350°F (175°C) for approximately 12 minutes. Once baked, if the indentations have puffed up, gently press them again to ensure room for the filling.
- Prepare Mint Fudge Filling: In a small saucepan over medium heat, melt the white chocolate chips and sweetened condensed milk together, stirring continuously until smooth. Remove from heat and mix in the mint extract and a few drops of green food coloring if desired for a minty green hue.
- Fill and Decorate Cookies: Spoon the mint fudge mixture into the thumbprint centers of the cooled cookies. Melt the chocolate almond bark separately and drizzle it over the filled cookies for an elegant finishing touch.
Notes
- Ensure butter is softened to room temperature for easier creaming with sugar.
- Press the centers of the cookies again immediately after baking if they rise to maintain space for the filling.
- Green food coloring is optional but adds a festive minty appearance to the filling.
- Allow the filled cookies to set at room temperature or refrigerate briefly for the fudge to firm up.
- Store cookies in an airtight container at room temperature for up to 5 days.


