
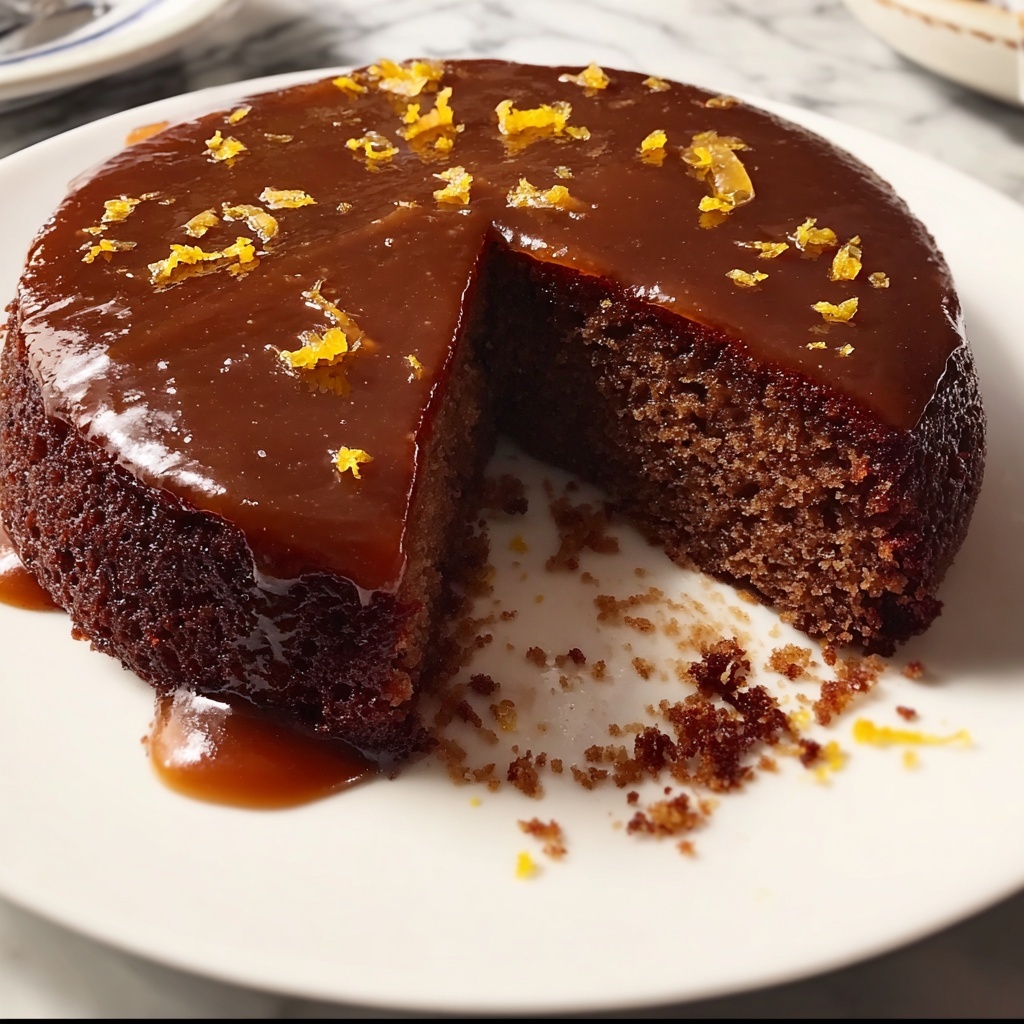
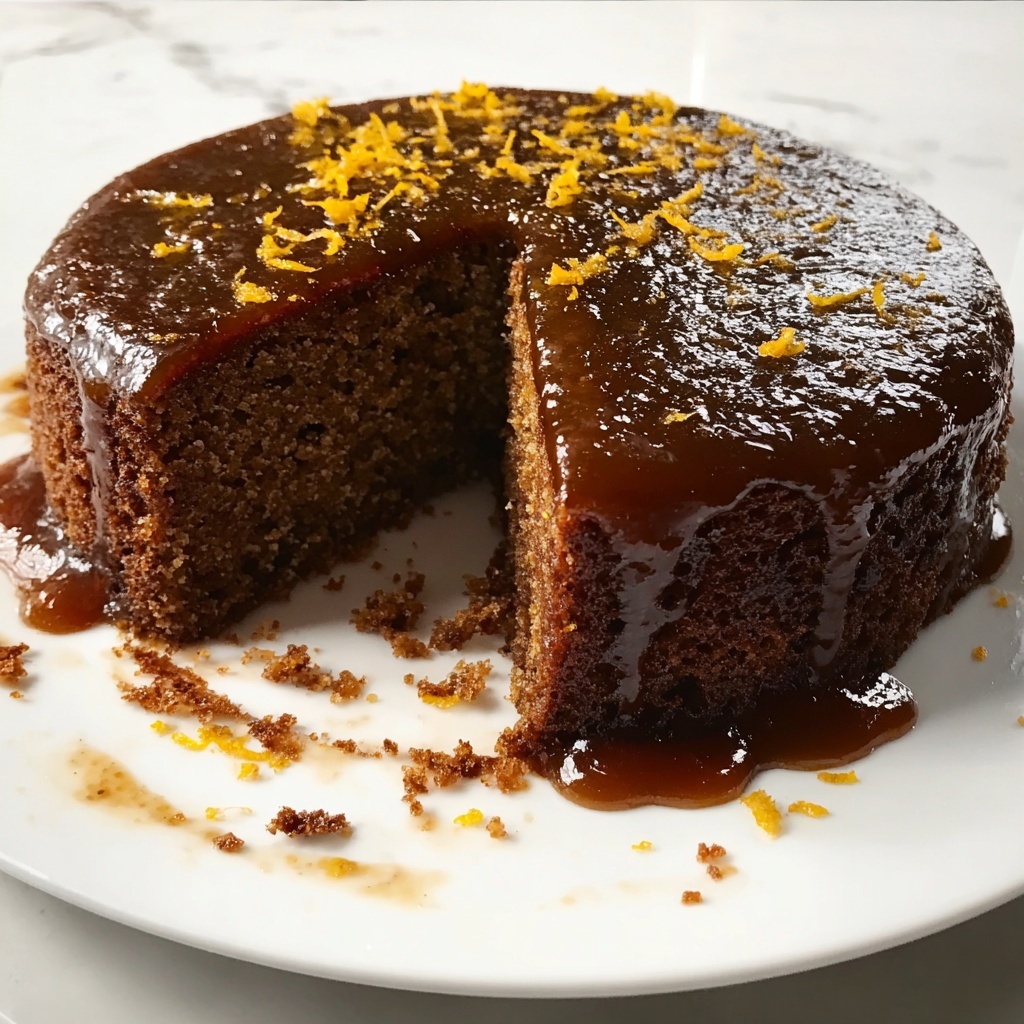
If you’re on the hunt for a dessert that feels both cozy and sophisticated, this Brown Butter Date & Orange Cake Recipe is an absolute must-try. Imagine the deep, nutty richness of brown butter merging seamlessly with the natural caramel sweetness of chopped dates, all brightened up with the fresh zing of orange zest and juice. This cake isn’t just a treat for your taste buds; it’s an experience that invites you to savor every bite and share moments with loved ones. Perfectly moist, with just the right balance of flavors, it’s a dessert that feels like a warm hug on a plate.
Ingredients You’ll Need
These ingredients are wonderfully straightforward but come together to create a symphony of flavors and textures in this cake. Each element plays an important role, from the golden brown butter that adds depth to the tender crumb, to the fresh citrus notes that brighten every bite.
- Unsalted butter: Browning the butter releases a nutty aroma that forms the cake’s rich foundation.
- Brown sugar: Adds a deep caramel sweetness and moisture to the cake.
- Granulated sugar: Balances sweetness and helps with the cake’s texture.
- Eggs: Provide structure and richness, binding all ingredients harmoniously.
- All-purpose flour: The backbone of the cake, providing the perfect crumb.
- Baking powder & baking soda: These leavening agents ensure the cake rises beautifully and has a tender crumb.
- Salt: Enhances and balances the sweetness and flavors.
- Ground cinnamon: Adds a warm, aromatic spice that complements the dates and orange.
- Fresh orange zest: Infuses bright citrus flavor into every moist bite.
- Chopped dates: Brings natural sweetness and chewy texture that pairs perfectly with the brown butter.
- Orange juice: Adds acidity and freshness, keeping the cake moist.
- Powdered sugar and extra orange juice (for the glaze): A simple glaze to crown the cake with a shimmering, tangy finish.
How to Make Brown Butter Date & Orange Cake Recipe
Step 1: Prepare your oven and pan
Start by preheating your oven to a cozy 350°F (175°C). This ensures everything cooks evenly once your batter is ready. Grease and flour a 9-inch round cake pan, or for ease, line it with parchment paper to prevent sticking and help with neat removal.
Step 2: Brown the butter
This step is where magic begins. Melt the unsalted butter in a medium saucepan over medium heat. Keep stirring gently as it changes from pale yellow to a gorgeous golden brown, releasing a warm, nutty aroma that makes you want to dive in immediately. This takes around 5 to 7 minutes, so stay close to avoid burning. Once browned, remove from heat and let it cool slightly.
Step 3: Mix sugars with the brown butter
In a large mixing bowl, combine both the brown and granulated sugars. Then slowly pour the luscious browned butter over the sugars and mix it until smooth and fully combined. This mixture will form the flavorful, moist base of your cake.
Step 4: Add eggs
One at a time, incorporate the eggs into the batter. Mixing thoroughly after each addition ensures a uniform, smooth texture that will help the cake rise and hold together beautifully.
Step 5: Combine dry ingredients
In a separate bowl, whisk together flour, baking powder, baking soda, salt, and cinnamon. This warms the spices with the other dry ingredients, creating even distribution and a subtle spice that will infuse the whole cake.
Step 6: Alternate adding dry ingredients and orange juice
Carefully fold the dry mixture into the wet batter in portions, alternating with the fresh orange juice. Start and finish with the dry ingredients to maintain a balanced consistency. Mix just until combined to keep the crumb tender.
Step 7: Fold in dates and orange zest
Gently add your chopped dates and colorful orange zest, folding them in evenly. These bursts of natural sweetness and citrus aroma create the delightful signature flavors of this cake.
Step 8: Bake the cake
Pour the batter into your prepared pan and smooth the surface. Bake in your preheated oven for 30 to 35 minutes, keeping an eye on the golden top. Insert a toothpick in the center — if it comes out clean, your cake is ready.
Step 9: Cool the cake
Let your cake rest in the pan for about 10 minutes before transferring it to a wire rack. Cooling completely allows the flavors to settle and makes glazing more effective.
Step 10: Prepare and add the glaze
Whisk powdered sugar with orange juice until smooth. Adjust the thickness to your liking by adding juice or powdered sugar. Drizzle this glaze generously over the top, letting it cascade down the sides for a beautiful finishing touch.
Step 11: Slice and enjoy
Cut into luscious slices and serve. Whether for a special occasion or a sweet everyday moment, each bite reveals the wonderful harmony of the Brown Butter Date & Orange Cake Recipe.
How to Serve Brown Butter Date & Orange Cake Recipe
Garnishes
A sprinkle of extra orange zest or a handful of toasted nuts makes a lovely garnish that adds texture and visual appeal. A few whole dates or a thin orange slice on top can also brighten the presentation while complementing the flavors perfectly.
Side Dishes
This cake pairs beautifully with a dollop of whipped cream, a scoop of vanilla bean ice cream, or a small bowl of fresh berries. The creaminess balances the rich brown butter and dates, while the berries add freshness to each bite.
Creative Ways to Present
For a delightful twist, try serving the cake in mini ramekins or as a layered cake with some mascarpone cheese between layers. You can also make individual slices and drizzle the glaze artistically on each plate for an elegant touch.
Make Ahead and Storage
Storing Leftovers
Once cooled, store the cake in an airtight container at room temperature for up to three days to maintain its moist texture and fresh flavor. If your kitchen feels warm, refrigeration is fine, just bring the cake back to room temperature before serving for the best taste.
Freezing
This cake freezes wonderfully! Wrap it tightly in plastic wrap and place it in a freezer-safe bag or container. Freeze for up to two months. Thaw overnight in the refrigerator or on the counter before glazing or serving.
Reheating
If you prefer your cake slightly warm, just pop slices into a microwave for 15 to 20 seconds or warm briefly in a low oven. This step brings out the aromatic qualities of the brown butter and orange beautifully.
FAQs
Can I substitute the dates with another dried fruit?
Absolutely! Chopped figs, raisins, or dried apricots can be delicious alternatives. Just keep the texture in mind and chop them finely so they integrate well into the batter.
Do I have to brown the butter for this recipe?
Browning the butter is key to the cake’s signature nutty flavor. While you can use melted butter as a shortcut, browning results in a richer, more complex taste that’s worth the few extra minutes.
Is it necessary to use fresh orange juice and zest?
Fresh is best! The bright, vibrant citrus notes come from fresh orange zest and juice. Bottled juice won’t deliver the same freshness, and zest loses much of its aroma when dried.
Can I make this cake gluten-free?
Yes, you can swap the all-purpose flour for a gluten-free blend designed for baking. Just be sure it contains xanthan gum or a similar binder for structure.
How long will the cake stay moist after baking?
This cake stays wonderfully moist for at least three days if stored properly. The brown butter and orange juice help retain moisture, making it perfect to bake ahead.
Final Thoughts
The Brown Butter Date & Orange Cake Recipe is one of those rare desserts that feel comforting and luxurious at the same time. Whether you’re treating yourself during a quiet afternoon or impressing friends at a gathering, it’s guaranteed to become a longtime favorite. Don’t hesitate—grab your ingredients, savor each step, and enjoy the magic of this unforgettable cake.
Print
Brown Butter Date & Orange Cake Recipe
- Prep Time: 15 minutes
- Cook Time: 35 minutes
- Total Time: 50 minutes
- Yield: 8 servings
- Category: Dessert
- Method: Baking
- Cuisine: American
- Diet: Vegetarian
Description
This Brown Butter Date & Orange Cake is a moist and flavorful dessert that combines the rich nuttiness of browned butter with the natural sweetness of dates and a fresh citrusy kick from orange zest and juice. Finished with a light orange glaze, this cake offers a perfect balance of sweet and tangy flavors, making it an irresistible treat for any occasion.
Ingredients
Cake Ingredients
- Unsalted butter – 1 cup (227 grams)
- Brown sugar – 1 cup (200 grams)
- Granulated sugar – 1/2 cup (100 grams)
- Eggs – 3 large
- All-purpose flour – 1 1/2 cups (190 grams)
- Baking powder – 1 teaspoon
- Baking soda – 1/2 teaspoon
- Salt – 1/4 teaspoon
- Ground cinnamon – 1/2 teaspoon
- Fresh orange zest – 1 tablespoon (from about 1 orange)
- Chopped dates – 1 cup (about 150 grams)
- Orange juice – 1/4 cup (freshly squeezed)
Glaze Ingredients
- Powdered sugar – 1 cup (120 grams)
- Orange juice – 2 tablespoons (freshly squeezed)
Instructions
- Preheat Oven and Prepare Pan: Preheat your oven to 350°F (175°C). Grease and flour a 9-inch round cake pan or line it with parchment paper to prevent sticking.
- Brown the Butter: In a medium saucepan over medium heat, melt the unsalted butter. Continue cooking while stirring frequently until the butter turns a golden brown color and releases a nutty aroma, about 5-7 minutes. Remove from heat and allow it to cool slightly.
- Mix Sugars and Butter: In a large mixing bowl, combine the brown sugar and granulated sugar. Pour the browned butter over the sugars and stir until thoroughly combined.
- Add Eggs: Add the eggs one at a time to the sugar-butter mixture, mixing well after each addition to ensure they are fully incorporated.
- Combine Dry Ingredients: In a separate bowl, whisk together the all-purpose flour, baking powder, baking soda, salt, and ground cinnamon to ensure even distribution.
- Combine Wet and Dry Ingredients: Gradually add the dry mixture to the wet mixture, alternating with the orange juice. Start and end with the dry ingredients, mixing just until combined to avoid overmixing.
- Incorporate Dates and Orange Zest: Gently fold in the chopped dates and fresh orange zest until they are evenly distributed throughout the batter.
- Transfer Batter and Bake: Pour the batter into the prepared cake pan and smooth the top with a spatula. Bake in the preheated oven for 30-35 minutes, or until a toothpick inserted into the center comes out clean.
- Cool the Cake: Remove the cake from the oven and let it cool in the pan for about 10 minutes. Then transfer the cake onto a wire rack to cool completely.
- Prepare the Glaze: In a small bowl, whisk together the powdered sugar and orange juice until smooth. Adjust the glaze consistency by adding more orange juice or powdered sugar as needed.
- Glaze the Cake: Once the cake has fully cooled, drizzle the orange glaze over the top, allowing it to drip down the sides for a decorative touch.
- Serve: Slice the cake and serve on a white plate. Enjoy the rich, nutty flavors combined with the sweet dates and bright citrus notes in every bite.
Notes
- You can soak the chopped dates in warm water or orange juice for 10 minutes before folding them into the batter to make them plumper and more flavorful.
- Ensure the browned butter has cooled slightly before mixing with the sugars to prevent cooking the eggs when added.
- Be careful not to overmix the batter once the dry ingredients are added to maintain a tender crumb.
- Store leftover cake in an airtight container at room temperature for up to 3 days or refrigerate for up to a week.
- For a dairy-free version, substitute the unsalted butter with vegan butter or margarine.

