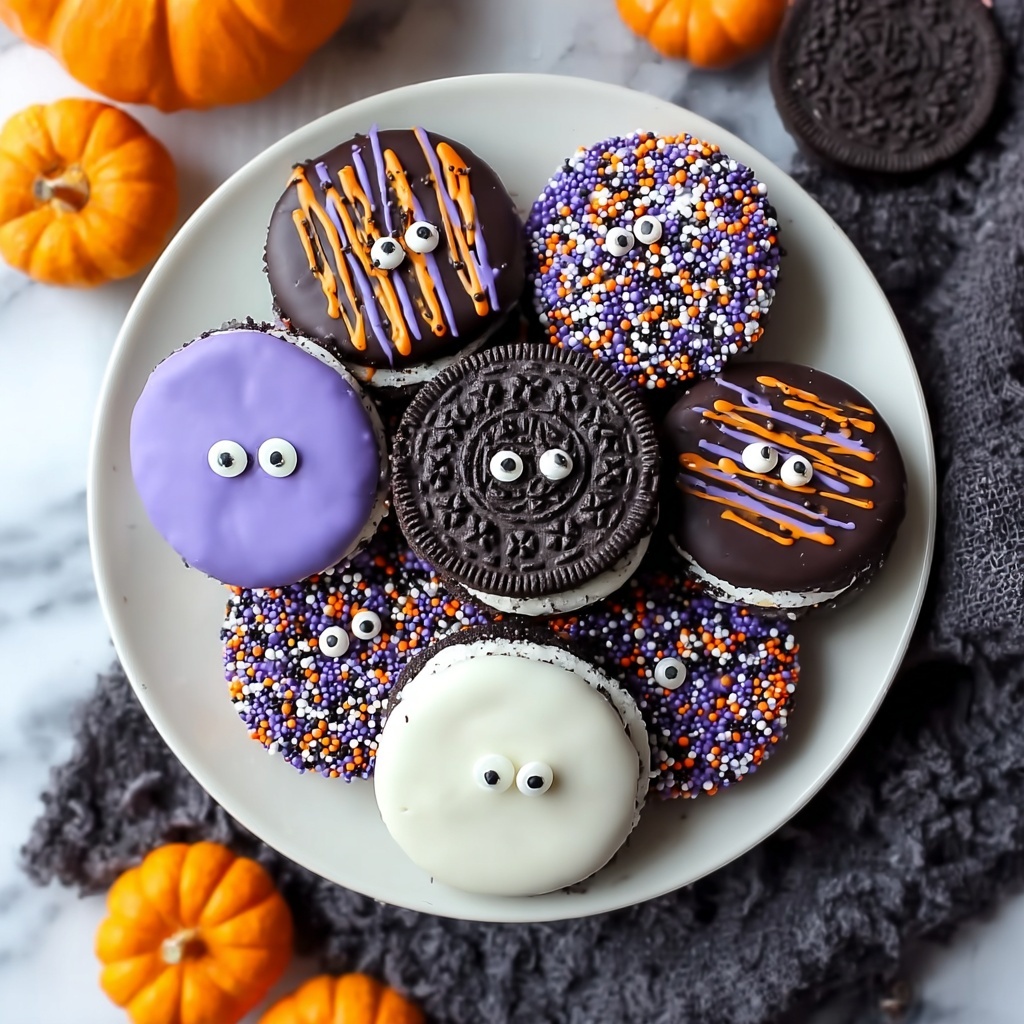
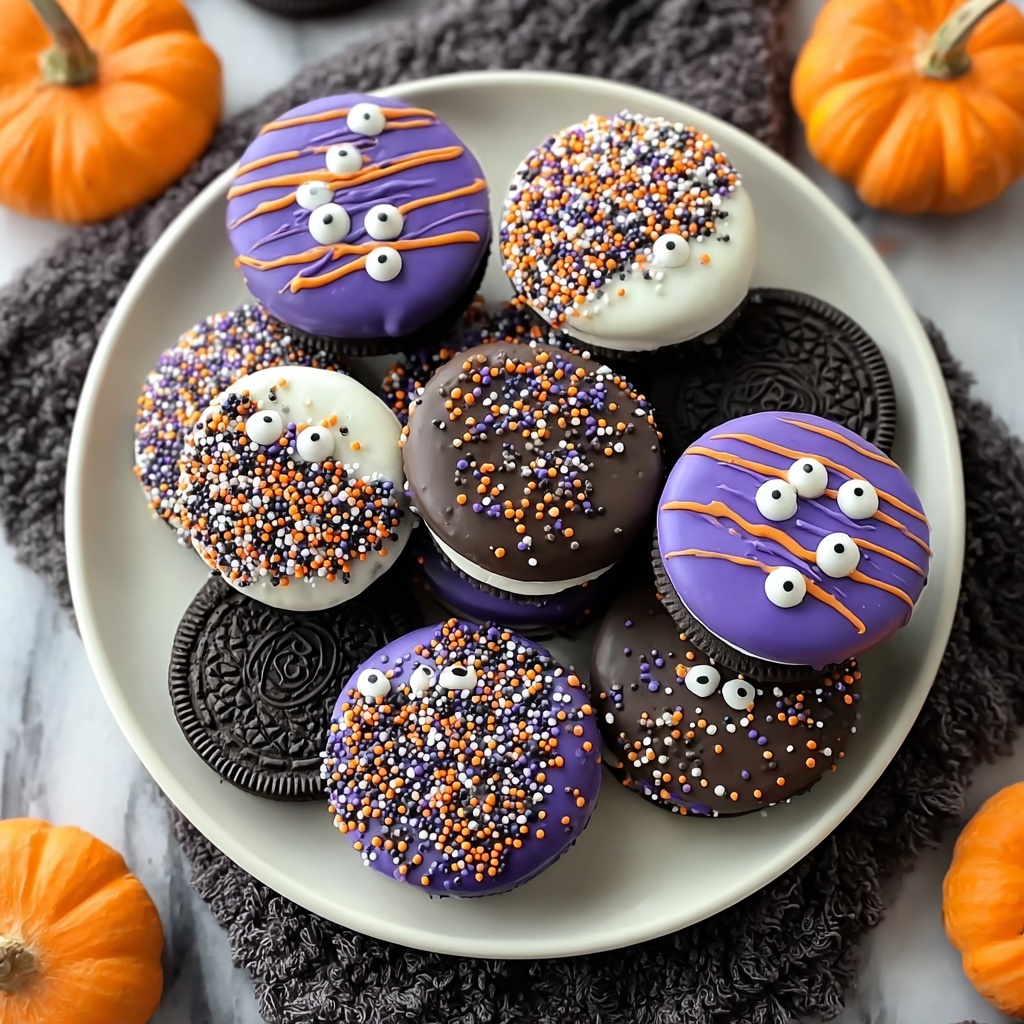
There is something utterly enchanting about combining classic treats with festive flair, and that’s exactly what makes the Spooky Scary Halloween Chocolate Dipped Oreo Cookies Recipe a must-try for your holiday celebrations. These cookies bring together the nostalgic crunch of Oreos with rich, melty chocolate in spooky shades of orange and purple. Topped with playful sprinkles and candy eyes, they transform simple cookies into Halloween masterpieces that are as fun to make as they are to eat. Whether you’re hosting a party, packing school treats, or just craving a seasonal sweet, this recipe is the perfect blend of spooky and delicious.

Ingredients You’ll Need
Gathering the right ingredients is key to achieving those perfect spooky and colorful treats. Each element plays a vital role, from the smoothness of the melting chocolate to the vibrant hues of the food coloring and the fun of the Halloween decorations. You’ll find the ingredient list simple yet essential for creating the ultimate festive cookies.
- 20 Oreo cookies: The classic cookie provides a sturdy base and familiar crunch that everyone loves.
- 12 oz semi-sweet chocolate chips: This rich chocolate coats the Oreos for a luscious, slightly bittersweet flavor.
- 12 oz white chocolate chips: Perfect for creating bright, colorful drizzles and designs on each cookie.
- 1 tablespoon coconut oil, divided: Helps to smooth and thin the chocolate for easy dipping and drizzling.
- Orange and purple food coloring: Adds that essential Halloween vibe with vibrant, festive colors.
- Halloween-themed sprinkles and edible decorations like candy eyes: The finishing touch that brings each cookie’s spooky personality to life.
How to Make Spooky Scary Halloween Chocolate Dipped Oreo Cookies Recipe
Step 1: Prepare Your Workspace
Start by lining a baking sheet with parchment paper. This simple step prevents sticking and keeps your cookies safe while the chocolate sets. Having this ready upfront makes the decorating process smooth and stress-free.
Step 2: Melt the Semi-Sweet Chocolate
In a microwave-safe bowl, combine the semi-sweet chocolate chips with half of the coconut oil. Microwave in 30-second bursts, stirring in between. This patience ensures a silky, lump-free chocolate perfect for dipping your Oreos in glossy goodness.
Step 3: Melt the White Chocolate
Using the same method, melt the white chocolate chips with the remaining coconut oil. White chocolate can be a bit more delicate, so stirring frequently helps to avoid overheating and keep it smooth.
Step 4: Add Halloween Colors
Divide the melted white chocolate into two bowls. Stir in orange food coloring into one and purple into the other until they are fully blended. This split creates the perfect palette for ghostly drizzles and spooky decorations that scream Halloween.
Step 5: Dip the Oreos
Dip each Oreo halfway into the semi-sweet melted chocolate, then let the excess drip off. Place them gently on your parchment-lined tray. This half-and-half look gives a striking contrast and provides a delicious base for your colorful accents.
Step 6: Drizzle with Spooky Colors
Using a spoon or piping bag, drizzle the orange and purple white chocolate over the dipped Oreos. You can get as creative as you want here—zigzags, swirls, or even bat-wing shapes. Each cookie becomes a unique work of edible art.
Step 7: Decorate with Halloween Sprinkles
While the chocolate is still wet, decorate your cookies with festive sprinkles and candy eyes. This step brings a playful and eerie personality to each bite-worthy creation that will delight kids and adults alike.
Step 8: Let the Chocolate Set
Allow your masterpiece cookies to sit at room temperature until the chocolate hardens, or pop them in the fridge for a quicker set. This ensures perfect snap and texture when you sink your teeth into them.
Step 9: Storage
Once set, place the cookies in an airtight container to keep them fresh and ready for your Halloween festivities until you’re ready to share.
How to Serve Spooky Scary Halloween Chocolate Dipped Oreo Cookies Recipe
Garnishes
To elevate your spooky treats, garnish with extra candy eyes, mini plastic spiders around the platter, or scatter edible glitter for a magical shimmer. The right garnishes make these cookies the centerpiece of any Halloween dessert table.
Side Dishes
Pair these cookies with a mug of hot cocoa topped with marshmallows or a festive pumpkin spice latte. The contrast of warm drinks and cool chocolate offers a comforting, cozy vibe perfect for crisp autumn evenings.
Creative Ways to Present
Serve these cookies stacked on a tiered cake stand surrounded by faux spiderwebs and tiny LED lights for a dramatic display. You could also place them inside small treat bags tied with Halloween ribbons as fun party favors or classroom treats.
Make Ahead and Storage
Storing Leftovers
Keep your leftover cookies fresh by storing them in an airtight container at room temperature for up to a week. Avoid humid places so the chocolate remains crisp and doesn’t melt or get sticky.
Freezing
If you want to make these cookies in advance, wrap them tightly in plastic wrap and then place in a freezer-safe container. Frozen properly, they stay delicious for up to a month. When ready, thaw at room temperature for best results.
Reheating
These cookies are best enjoyed as they are, so reheating is not recommended because the chocolate details may soften or lose their charm. Instead, let them come to room temperature if coming out of the fridge or freezer for the perfect texture.
FAQs
Can I use other types of cookies besides Oreos?
Absolutely! While Oreos are classic, you can certainly try chocolate-dipped cookies with similar texture and size. Just keep in mind the flavor balance will shift depending on the cookie used.
Is it necessary to use coconut oil when melting chocolate?
Adding coconut oil helps the chocolate melt smoothly and achieve a nice glossy finish. It also keeps the chocolate from becoming too thick for dipping and drizzling. You can try without, but the texture might be less silky.
Can I use gel food coloring for the white chocolate?
Yes, gel food coloring is recommended because it adds vibrant color without thinning the chocolate too much. Liquid colorings can make the chocolate seize or become grainy.
How do I prevent the dips from becoming messy or too thick?
Microwave the chocolate in short intervals and stir thoroughly. Adding a small amount of coconut oil thins the chocolate, making it easier to coat the cookies evenly without clumps.
Can I make these cookies vegan or dairy-free?
To make a vegan-friendly version, select dairy-free chocolate chips and ensure your sprinkles and decorations are vegan. Coconut oil works well in place of butter, making this treat adaptable for various diets.
Final Thoughts
Making the Spooky Scary Halloween Chocolate Dipped Oreo Cookies Recipe is such a joyful experience, combining creative decorating with irresistible flavors. They’re a festive way to get into the Halloween spirit while delighting friends and family with a personally crafted treat. So grab your chocolate and Oreos, and dive into a fun kitchen adventure that ends with delicious, spooky perfection!
Print
Spooky Scary Halloween Chocolate Dipped Oreo Cookies Recipe
- Prep Time: 0h 20m
- Cook Time: 0h 10m
- Total Time: 0h 30m
- Yield: 20 cookies
- Category: Dessert
- Method: No-Cook
- Cuisine: American
Description
These Spooky Scary Halloween Chocolate Dipped Oreo Cookies are a fun and festive treat perfect for Halloween celebrations. Oreo cookies are dipped in melted semi-sweet chocolate and decorated with orange and purple colored white chocolate, along with Halloween-themed sprinkles and edible decorations like candy eyes. They are easy to make, no-bake, and visually impressive for parties or trick-or-treaters.
Ingredients
Main Ingredients
- 20 Oreo cookies
- 12 oz semi-sweet chocolate chips
- 12 oz white chocolate chips
- 1 tablespoon coconut oil, divided
Decorations
- Orange food coloring
- Purple food coloring
- Halloween-themed sprinkles
- Edible decorations like candy eyes
Instructions
- Prepare Baking Sheet: Line a baking sheet with parchment paper and set it aside for the dipped cookies to rest on.
- Melt Semi-Sweet Chocolate: In a microwave-safe bowl, combine semi-sweet chocolate chips with 1/2 tablespoon of coconut oil. Microwave in 30-second intervals, stirring after each until the chocolate is completely melted and smooth.
- Melt White Chocolate: In another microwave-safe bowl, combine white chocolate chips with the remaining 1/2 tablespoon of coconut oil. Microwave in 30-second intervals, stirring until smooth and fully melted.
- Color White Chocolate: Divide the melted white chocolate evenly into two bowls. Add a few drops of orange food coloring to one bowl and purple food coloring to the other. Stir until the colors are evenly mixed.
- Dip Oreos: Dip each Oreo cookie halfway into the melted semi-sweet chocolate, allowing any excess to drip off. Place each dipped cookie onto the prepared parchment-lined baking sheet.
- Decorate Cookies: Drizzle or spread the colored white chocolates (orange and purple) over the dipped Oreos to create spooky Halloween patterns.
- Add Sprinkles and Decorations: While the white chocolate is still wet, add Halloween-themed sprinkles and edible decorations like candy eyes for a festive effect.
- Set the Chocolate: Let the cookies sit at room temperature until the chocolate hardens, or place them in the refrigerator for faster setting.
- Store: Once the chocolate is set, transfer the cookies to an airtight container until ready to serve or share.
Notes
- Use parchment paper to prevent the cookies from sticking while the chocolate sets.
- Microwave melting times may vary—stir often to avoid burning the chocolate.
- You can use gel food coloring instead of liquid for more vibrant colors without thinning the chocolate.
- Store cookies in a cool, dry place to maintain texture and decoration quality.
- Allow cookies to come to room temperature before serving for best taste and texture.


